reddragon
Established Member
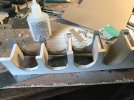
Is that paint tank prototypical of the area?Thanks guys. Much appreciated. @takno - This gives a good idea of scale, when it’s almost dwarfed by a little Humbrol paint tin.
View attachment 88739
Is that paint tank prototypical of the area?Thanks guys. Much appreciated. @takno - This gives a good idea of scale, when it’s almost dwarfed by a little Humbrol paint tin.
View attachment 88739
Thanks for that, I’d never attempted building anything like this until a couple of years ago. I’d love to have a go at 3D printing at some point but I haven’t had a chance to look into it yet.I'm a little caught between awe at how good your modelling skills are, and awe at how good cameras are these days!
Very much so! It’s what they whitewash houses with...Is that paint tank prototypical of the area?
3d printing always looks a bit disappointing to me - you've got to spend a lot of time cleaning up and filing after the print has finished, which defeats the object. I do fancy one of these though: https://www.hobbycraft.co.uk/cricut-maker-and-tool-set-bundle/647707-1000 - it's basically a laser-printer but with knives for ink, which you can use to get very accurate cuts in cardboard or plasticard.Thanks for that, I’d never attempted building anything like this until a couple of years ago. I’d love to have a go at 3D printing at some point but I haven’t had a chance to look into it yet.
That looks like a clever thing.3d printing always looks a bit disappointing to me - you've got to spend a lot of time cleaning up and filing after the print has finished, which defeats the object. I do fancy one of these though: https://www.hobbycraft.co.uk/cricut-maker-and-tool-set-bundle/647707-1000 - it's basically a laser-printer but with knives for ink, which you can use to get very accurate cuts in cardboard or plasticard.
I think I might have seen that photo somewhere before - 50032 looks quite dirty there! Nice to be able to link things to people on the forums.Ah @Peter C I actually had seen that photo but the version I’d seen was much more blurry so you couldn’t see the track details so well. Thanks for that.
Our very own @Ash Bridge was on that train and he took this photo at Barnstaple:
View attachment 88725
That looks absolutely brilliant - and when you remember it's N gauge, it's even better! The front bit vaguely reminds me of the firestation in 'Fireman Sam' with the pointed roof. Is that a post box on the front? I love that addition.Anyway I’ve been busy tinkering away with the buildings for the new section around the back of the layout over the last couple of weeks. I want to get everything built first while I keep testing the track thoroughly for any glitches, so I’ve made myself a little work bench in the corner of the front room where I spend much time chopping up tiny bits of plastic and balsa wood.
First up is the station buildings, I’d got as far as building the walls and putting the windows in but the roof was giving me the fear due to all the weird angles. In the end I just bit the bullet and made a start...
The first thing to do was to seal a section off downstairs so that I could put a light in it without it leaching through any gaps anywhere, once that was done and the main part of the roof was on it came together surprisingly quickly.
I’ve still got to weather the walls down a bit but this where I’ve got to at the moment:
View attachment 88726
View attachment 88727
Because the track through the station is slightly reversed compared to the real thing I’m naming this Eggishford because it’s Eggesfordish.
But from certain angles it looks pretty much right even though some of the windows and other bits are different.
It’s definitely the most complicated thing I’ve ever had to make though!
View attachment 88729
View attachment 88728
I've been wanting to get an interior for my signalbox for a while now and seeing yours makes me want to get on with it and do it. The trackplan diagram is brilliant as well!The other thing I’ve been making is the very distinctive signal box at the Exeter end of the station. This was a replacement for the original signal box that was severely damaged by floods in the 1960s (in fact it might even have been completely washed away along with the section of platform it sat on).
Again it’s not exactly the same because I just made it out of bits that I had kicking around in my box. It’ll have a light in it as well plus a wee man on the steps ready to swap the single line tokens.
Here’s a photo of the original (not my photo) taken sometime around 1987:
View attachment 88731
And here’s my recreation:
View attachment 88735
View attachment 88736
As my friend Paul said the other day “OK Nick well done, you have literally recreated the ugliest railway building in Devon...”
And what does every signal box need? That’s right an interior!
View attachment 88734
Utterly pointless, but at least I know that it’s there.
That bridge looks really nice with the trees and greenery on either side as well - looks like the kind of thing I'd like to include somehow on my layout.Next up will be a road over railway and river bridge with arches that I’m going to use as a scenic break. I took this photo of it last year:
View attachment 88738
So there you have it.
Thanks for reading this long rambling post guys.
You're very welcomeThanks Peter, much appreciated.
I’m actually sitting down raking through my box of bits to see what I’ve got in the way of plasticard, having inspected the photos of the bridge more closely I’ve realised that it’s actually got five arches because it crosses the River Taw as well.
Hmm...
")


Thanks @reddragon, I just got into the habit of using balsa because it’s easy to slice up with a knife and when you’re working in this scale you sometimes need to cut really small bits up to make wedges etc.An excellent finish, you certainly have more patience to do the finish than I have!
I'm curious, why do you not use ply & hardboard for the bridge structure? I find it gives a stronger neater structure for you to use.
Thanks @reddragon, I just got into the habit of using balsa because it’s easy to slice up with a knife and when you’re working in this scale you sometimes need to cut really small bits up to make wedges etc.
The other thing is I suppose I just feel comfortable and like working with it though really.
You’ll be alright, what you’ve done so far is excellent. You see I was making this in the corner of the front room so I was still able to be with the family but I could just do a bit on this now and again.Maybe you could get one of those cutting sets for small fiddly jobs?
When I get onto scenery I'll be looking at ideas to make the jobs a lot shorter and set up a production line! I will not have the time due to my layout size!!! and having no patience
You’ll be alright, what you’ve done so far is excellent. You see I was making this in the corner of the front room so I was still able to be with the family but I could just do a bit on this now and again.
It’s probably a bit different with your viaduct though!
I did it in the lounge for the same reason (after checking it fitted through loft hatch). The finishing . . . . . well I have the bits!
I saw your post this morning but completely forgot to respond - my main thought is well done! That bridge looks superb and the detail on it confuses me as to whether it's N gauge or something much bigger!Speaking of bridges (and I’m only posting this this time of night because I’m a bit wired from staring at tiny bits of plastic)...
I knocked the five arch bridge up this weekend and used almost every last scrap of plasticard, balsa wood and primer that I had kicking about.
Quite a bit of it is going to be hidden by trees just like the real thing and it’s also going to form part of the scenic break, so how much of it will actually be seen I’m not sure of yet.
It’s also going to have a bit of foliage on it which will be good anyway as I’ve had to join the plastic up here and there so it’ll hide any problem bits.
OK so let’s do a quick montage of the process before you get too bored.
1) Start with bit of plasticard, stare at it for a while. Measure how big the thing needs to be, stare in box, panic, stare back at plasticard and start drawing out shape using thinners lid to draw top of arches.
View attachment 88802
2) cut shape of bridge out, do the same for the opposite side (I’ve only detailed one side as you won’t be able to see the other one, please don’t tell anyone though), put bridge sides over balsa wood, draw around shapes, cut balsa wood to same shapes. Collect every bit of matching stone embossed plasticard, cut bits straight using right angled metal thingy to cut around and clad the front with whatever you can find before doing the inside of the parapets with whatever’s left.
Trim around (God this is taking ages, sorry) the shape of the bridge sides carefully.
Starting to look like something now:
View attachment 88803
3) Basically glue it all together out of bits of balsa wood - Do it on something flat!
I’ve got a metal ruler and the width of the inserts you can see are exactly the same width of the ruler (by design by the way. I thought about this and everything).
You can also see that I’ve cut a really thin (two brick course) strip out to go along the base of the parapet at road level. There’s probably a technical term for those bricks.
View attachment 88805
4) I’ve cut out a bit of card for the road (not fixed in for now) and cut the arches out by using a different sheet of stone plasticard (the stones are too large really which is why I didn’t use it anywhere else but you can’t see it too well under the archways). The arches were put in by me gluing where they had to go and then rolling the plastic in and pushing it into place before trimming the edges with a sharp knife and then sanding around every edge and corner of the bridge.
I then masked up around where the arches needed to be and trimmed the masking tape off the bits where I wanted to fill.
Instead of using filler, this time I used decorators caulk and smoothed it into the areas I wanted it plus any other gaps around the structure. I’ll definitely do that again because it adhered well.
View attachment 88806
5) A few hours later it was all dry so I carved the shapes of the stones into the arches and sprayed the whole lot with the last of a tin of primer before painting it up - I’ve tried to match it up with the other bridges I’ve done for the layout so that they tie in.
The real bridge isn’t too straight at all in places so I’ve tried to keep it a bit rustic.
The real one is here (you can see the other arches if you look carefully. The fourth one is the river).
View attachment 88828
Mine (The second arch is meant to be higher by the way and on mine the left two arches are higher off the ground like the real one)
View attachment 88807
If you’re still here thanks very much for reading.
The way you've actually built the bridge looks to be really good as well, and a way I'd not thought of doing something like that. Did you do any measuring on the real thing (maybe not wandering around it with your tape measure, but perhaps on Google Earth/Maps), or is that just based on the dimensions on the layout?HahaThanks for the comments guys. @Peter C - Nah.I just took some photos, looked at it and hoped for the best really, although I did hold a bit of plasticard up to one of my other bridges to draw around the arches from the inside with a pen.
Actually I can’t get to that corner of the railway at the moment so I hope it fits as it’s on one of the curves that I super-elevated, I’ll have a look when I get back from work.
It looks really good and very close to the prototype, which is even more impressive when you consider you didn't have 'proper' measurements to base it off of. Haha
Let's hope it fits!
-Peter

Brilliant!
You need to do a bridge blog so we can see how to do it too!
Well I did a bit in post #128 but I didn’t want to bore the pants off everyone.You need to do a bridge blog so we can see how to do it too!
Looks very good and its N gauge too!
I challenge you to . . . a large viaduct like mine but in N gauge. Southern have a few similarWell I did a bit in post #128 but I didn’t want to bore the pants off everyone.
I’m going to need a bigger house?I challenge you to . . . a large viaduct like mine but in N gauge. Southern have a few similar")
Don't you have a loft? or maybe a garden railway section!!I’m going to need a bigger house?
I'm now wondering how N Gauge would fare in a garden with inclement weather (or, more likely, the day after some inclement weather)...Don't you have a loft? or maybe a garden railway section!!
It would be in serious danger of disaster from a falling leaf.I'm now wondering how N Gauge would fare in a garden with inclement weather (or, more likely, the day after some inclement weather)...
-Peter
It would be in serious danger of disaster from a falling leaf.
Unfortunately no loft @reddragon. They were converted to extra bedroom space a few years ago. Hoping to gain one back when a kid or two moves out in the next couple of years
Dammit. We just got fibre!They don't move out as young as they used to. Apparently endless chores and poor internet helps!
Haha - talk about leaves on the line or the wrong type of snow; in N I'd expect fallen branches would often cause trains to be delayed due to 'a tree on the line'...It would be in serious danger of disaster from a falling leaf.
Could you not take it back and get a different cereal?Dammit. We just got fibre!