-
Our new ticketing site is now live! Using either this or the original site (both powered by TrainSplit) helps support the running of the forum with every ticket purchase! Find out more and ask any questions/give us feedback in this thread!
You are using an out of date browser. It may not display this or other websites correctly.
You should upgrade or use an alternative browser.
You should upgrade or use an alternative browser.
Lapford station in N gauge.
- Thread starter Cowley
- Start date
- Status
- Not open for further replies.
Sponsor Post - registered members do not see these adverts; click here to register, or click here to log in
R
RailUK Forums
reddragon
Established Member
Twigs are fallen trees!Haha - talk about leaves on the line or the wrong type of snow; in N I'd expect fallen branches would often cause trains to be delayed due to 'a tree on the line'...
Could you not take it back and get a different cereal?
-Peter
Get an IT expert to limit their internet! Mine enjoys his 300mb up/down
Good idea.Twigs are fallen trees!
Get an IT expert to limit their internet! Mine enjoys his 300mb up/down
Tonight I have mostly been painting very small Transit vans:

I’m sure all of us over a certain age have been tailgated by Wayne’s knackered blue Transit. It makes me shudder just looking at it.
On a country road it’s the fastest vehicle known to man, and nobody really knows what Wayne does for a living, but he’s always in a rush to get everywhere and a lot of local children in various villages have very similar facial characteristics to him strangely enough...
...
And trees. Lots of trees! I need so many trees for the new bits.
Buying 200 or so trees of a decent quality is not a cheap option, so it’s back to making them out of fine jewellery wire...
Here’s the first ten under construction, if I can do ten a night over the next few weeks I’ll be getting there (just like BR in the eighties

Last edited:
Iskra
Established Member
So true about transit vans and country roads 
Your trees are looking very fine. How will you add leaves?
Your trees are looking very fine. How will you add leaves?
Well what I did last time is paint the trunks and branches with a couple of coats of latex (it’s very smelly), spray them brown - probably going to use our old friend Railmatch Sleeper Grime for that job. Then I have a bowl of PVA and I roll the top of the tree in it, before stretching Woodland Scenics green foliage over branches:So true about transit vans and country roads
Your trees are looking very fine. How will you add leaves?

I then dunk it into a bowl of green scatter to bulk it out a bit and hey presto you have a tree (repeat 200 times).
All of these were done that way but it’s a bit time consuming.
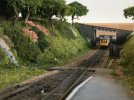
This guy does them really well and I pretty much follow his methods mostly, especially how he does the wire:
Iskra
Established Member
Ah they do look really good though so definitely worth the effort!
hexagon789
Veteran Member
Yes, it seems to plague certain areas round here as well!I’m sure all of us over a certain age have been tailgated by Wayne’s knackered blue Transit. It makes me shudder just looking at it.
On a country road it’s the fastest vehicle known to man, and nobody really knows what Wayne does for a living, but he’s always in a rush to get everywhere and a lot of local children in various villages have very similar facial characteristics to him strangely enough...
The transits look excellent
Perhaps he's leafing it for later??Your trees are looking very fine. How will you add leaves?
(Sorry I couldn't resist!!!)
@hexagon789 - You need to take a long hard look at yourself for that one. 
hexagon789
Veteran Member
They should get me to write the jokes you get in Xmas crackers - I seem to already produce the right type of material for it!@hexagon789 - You need to take a long hard look at yourself for that one.
They should get me to write the jokes you get in Xmas crackers - I seem to already produce the right type of material for it!
To be fair I have read (and sometimes had to delete) worse in the Jokes Thread...
hexagon789
Veteran Member
I'm not going to ask...To be fair I have read (and sometimes had to delete) worse in the Jokes Thread...
I was going to ask - who's make are the Transits/where did you obtain them?
hexagon789
Veteran Member
Cheers, wrong scale but I'll have a look aroundMy friend just sent me this. He got 75 of them and passed a few on to me:
View attachment 89109
Haha - love itTonight I have mostly been painting very small Transit vans:
View attachment 89024
I’m sure all of us over a certain age have been tailgated by Wayne’s knackered blue Transit. It makes me shudder just looking at it.
On a country road it’s the fastest vehicle known to man, and nobody really knows what Wayne does for a living, but he’s always in a rush to get everywhere and a lot of local children in various villages have very similar facial characteristics to him strangely enough...
Those look really good @Cowley - I've often thought about making some of my own trees but the only issue is where to put them - I mean, where they'd grow...And trees. Lots of trees! I need so many trees for the new bits.
Buying 200 or so trees of a decent quality is not a cheap option, so it’s back to making them out of fine jewellery wire...
Here’s the first ten under construction, if I can do ten a night over the next few weeks I’ll be getting there (just like BR in the eighties).
View attachment 89030
I suppose the elderly lady in the house by Little Piddling on-the-Wold station wouldn't mind if she found a 50ft oak tree in her back garden? Network Rail might have something to say, though!
-Peter
reddragon
Established Member
Haha - love it
Those look really good @Cowley - I've often thought about making some of my own trees but the only issue is where to put them - I mean, where they'd grow...
I suppose the elderly lady in the house by Little Piddling on-the-Wold station wouldn't mind if she found a 50ft oak tree in her back garden? Network Rail might have something to say, though!
-Peter
In a few hours they should be covered in snow!
Yes!In a few hours they should be covered in snow!
 I'm quite the fan of snow and I've spent a lot of time over the years working out a way of making temporary snow for the layout during the Winter months...
-Peter
reddragon
Established Member
Yes, my oldest shows me the temporary snow on GTA each ChristmasYes!I'm quite the fan of snow and I've spent a lot of time over the years working out a way of making temporary snow for the layout during the Winter months...
-Peter
BrilliantYes, my oldest shows me the temporary snow on GTA each Christmas

-Peter
hexagon789
Veteran Member
The best I can think of is using some powdery substance which you'd then have to vacuum/sweep off to 'defrost' the layout to spring.Yes!I'm quite the fan of snow and I've spent a lot of time over the years working out a way of making temporary snow for the layout during the Winter months...
-Peter
You need to be careful everything you didn't want hoovered up was stuck down well though
That's what I was thinking: I've seen a few products which might work but they wouldn't be ideal.The best I can think of is using some powdery substance which you'd then have to vacuum/sweep off to 'defrost' the layout to spring.
You need to be careful everything you didn't want hoovered up was stuck down well though
-Peter
hexagon789
Veteran Member
I've seen a few layouts which have been converted from an original non-winter setting to winter but never one which could be converted back and forth at willThat's what I was thinking: I've seen a few products which might work but they wouldn't be ideal.
-Peter
I've seen a few of those as well. They do look pretty though!I've seen a few layouts which have been converted from an original non-winter setting to winter but never one which could be converted back and forth at will
-Peter
Evening everyone.
I had a bit of a crisis a couple of weeks ago which I don’t think I mentioned, which was this rather important and heavily embedded point that leads to the yard:
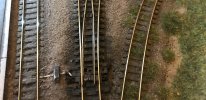
Basically the spring went under the tie bar and I couldn’t get to it underneath.
Also though, that point has always caused me issues with locos stalling on it so I decided in the end to bite the bullet and attempt a complete replacement. Here’s what I had to do though (I was nervous about doing this for obvious reasons).
I used a mini cutting disc first to slice through it and then pulled each section out gently after dissolving the PVA in the ballast with some thinners to loosen it all up:
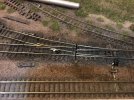
Then I got the p-way gang to remove the remaining bits of ballast and clean the area up (they were having a brew up in the guards van at this point):
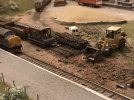
I masked up the important bits on the new point last night and sprayed it with Railmatch Sleeper Grime and also cut the sleepers back by a row so that I could put it into place and have a bit more room for manoeuvre with the fishplates as I was going to have to slide one end into situ once the point was in place.
It went in pretty easily in the end to be fair and after a bit of testing to make sure everything was running properly (it’s a huge improvement actually), I connected the point motor back up from underneath:
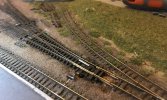
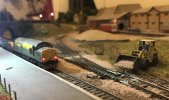
Then it was just a case of the chaps drawing 37035 forward with its ballast wagons and borrowing the digger from the warehouse again to drop the ballast back around the point. Jobs a good un (childish? Not me.).
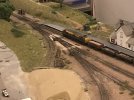
Here’s a shot from a distance away. I’m not sure which part of BR was responsible for weathering trackwork back then (probably the toilets on a mk1 actually), but I’ll need to get them in, and soon!
I had a bit of a crisis a couple of weeks ago which I don’t think I mentioned, which was this rather important and heavily embedded point that leads to the yard:

Basically the spring went under the tie bar and I couldn’t get to it underneath.
Also though, that point has always caused me issues with locos stalling on it so I decided in the end to bite the bullet and attempt a complete replacement. Here’s what I had to do though (I was nervous about doing this for obvious reasons).
I used a mini cutting disc first to slice through it and then pulled each section out gently after dissolving the PVA in the ballast with some thinners to loosen it all up:

Then I got the p-way gang to remove the remaining bits of ballast and clean the area up (they were having a brew up in the guards van at this point):

I masked up the important bits on the new point last night and sprayed it with Railmatch Sleeper Grime and also cut the sleepers back by a row so that I could put it into place and have a bit more room for manoeuvre with the fishplates as I was going to have to slide one end into situ once the point was in place.
It went in pretty easily in the end to be fair and after a bit of testing to make sure everything was running properly (it’s a huge improvement actually), I connected the point motor back up from underneath:

Then it was just a case of the chaps drawing 37035 forward with its ballast wagons and borrowing the digger from the warehouse again to drop the ballast back around the point. Jobs a good un (childish? Not me.).

Here’s a shot from a distance away. I’m not sure which part of BR was responsible for weathering trackwork back then (probably the toilets on a mk1 actually), but I’ll need to get them in, and soon!

reddragon
Established Member
Clearly not an easy task once ballasted! Almost realisticEvening everyone.
I had a bit of a crisis a couple of weeks ago which I don’t think I mentioned, which was this rather important and heavily embedded point that leads to the yard:
View attachment 89259
Basically the spring went under the tie bar and I couldn’t get to it underneath.
Also though, that point has always caused me issues with locos stalling on it so I decided in the end to bite the bullet and attempt a complete replacement. Here’s what I had to do though (I was nervous about doing this for obvious reasons).
I used a mini cutting disc first to slice through it and then pulled each section out gently after dissolving the PVA in the ballast with some thinners to loosen it all up:
View attachment 89258
Then I got the p-way gang to remove the remaining bits of ballast and clean the area up (they were having a brew up in the guards van at this point):
View attachment 89257
I masked up the important bits on the new point last night and sprayed it with Railmatch Sleeper Grime and also cut the sleepers back by a row so that I could put it into place and have a bit more room for manoeuvre with the fishplates as I was going to have to slide one end into situ once the point was in place.
It went in pretty easily in the end to be fair and after a bit of testing to make sure everything was running properly (it’s a huge improvement actually), I connected the point motor back up from underneath:
View attachment 89265
Then it was just a case of the chaps drawing 37035 forward with its ballast wagons and borrowing the digger from the warehouse again to drop the ballast back around the point. Jobs a good un (childish? Not me.).
View attachment 89264
Here’s a shot from a distance away. I’m not sure which part of BR was responsible for weathering trackwork back then (probably the toilets on a mk1 actually), but I’ll need to get them in, and soon!
View attachment 89255

Oh no! This is the exact kind of situation that I'm hoping won't arise with my layout once it's ballasted - I had a set of points a few years ago which stopped working and that was an awful lot of work to fix as it had been ballasted.Evening everyone.
I had a bit of a crisis a couple of weeks ago which I don’t think I mentioned, which was this rather important and heavily embedded point that leads to the yard:
View attachment 89259
Basically the spring went under the tie bar and I couldn’t get to it underneath.
Also though, that point has always caused me issues with locos stalling on it so I decided in the end to bite the bullet and attempt a complete replacement. Here’s what I had to do though (I was nervous about doing this for obvious reasons).
I used a mini cutting disc first to slice through it and then pulled each section out gently after dissolving the PVA in the ballast with some thinners to loosen it all up:
View attachment 89258
Then I got the p-way gang to remove the remaining bits of ballast and clean the area up (they were having a brew up in the guards van at this point):
View attachment 89257
I masked up the important bits on the new point last night and sprayed it with Railmatch Sleeper Grime and also cut the sleepers back by a row so that I could put it into place and have a bit more room for manoeuvre with the fishplates as I was going to have to slide one end into situ once the point was in place.
It went in pretty easily in the end to be fair and after a bit of testing to make sure everything was running properly (it’s a huge improvement actually), I connected the point motor back up from underneath:
View attachment 89265
Then it was just a case of the chaps drawing 37035 forward with its ballast wagons and borrowing the digger from the warehouse again to drop the ballast back around the point. Jobs a good un (childish? Not me.).
View attachment 89264
Here’s a shot from a distance away. I’m not sure which part of BR was responsible for weathering trackwork back then (probably the toilets on a mk1 actually), but I’ll need to get them in, and soon!
View attachment 89255
Love the bit about the PW team coming to fix it: I've had a few people in high-vis jackets on my layout recently getting the track sorted for the heritage line. I wouldn't say it's childish
-Peter
Iskra
Established Member
I think you've done it the exact same way NR would have done it! I'm glad you got it all sorted out and it is working properly now. It's very frustrating when trackwork goes wrong.
Have you thought about not weathering it? If you look on the real railways, there are definitely bits that are newer or recently replaced, so I see it as prototypical in a way and adding visual variety.
Have you thought about not weathering it? If you look on the real railways, there are definitely bits that are newer or recently replaced, so I see it as prototypical in a way and adding visual variety.
Thanks chaps. 
@Iskra - Yes I have thought about it and I may go down that route. It was always so run down there though that it looks a bit out of place. I’m going to have think about it today though before I do anything.
@Peter C - I haven’t forgotten your people by the way. Just haven’t managed to get anywhere near a post office this week unfortunately.
Last edited:
Haha - at least one of us remembers: I'd forgotten!@Peter C - I haven’t forgotten your people by the way. Just haven’t managed to get anywhere near a post office this week unfortunately.

-Peter
Nice story with a bit of P-way action.Evening everyone.
I had a bit of a crisis a couple of weeks ago which I don’t think I mentioned, which was this rather important and heavily embedded point that leads to the yard:
View attachment 89259
Basically the spring went under the tie bar and I couldn’t get to it underneath.
Also though, that point has always caused me issues with locos stalling on it so I decided in the end to bite the bullet and attempt a complete replacement. Here’s what I had to do though (I was nervous about doing this for obvious reasons).
I used a mini cutting disc first to slice through it and then pulled each section out gently after dissolving the PVA in the ballast with some thinners to loosen it all up:
View attachment 89258
Then I got the p-way gang to remove the remaining bits of ballast and clean the area up (they were having a brew up in the guards van at this point):
View attachment 89257
I masked up the important bits on the new point last night and sprayed it with Railmatch Sleeper Grime and also cut the sleepers back by a row so that I could put it into place and have a bit more room for manoeuvre with the fishplates as I was going to have to slide one end into situ once the point was in place.
It went in pretty easily in the end to be fair and after a bit of testing to make sure everything was running properly (it’s a huge improvement actually), I connected the point motor back up from underneath:
View attachment 89265
Then it was just a case of the chaps drawing 37035 forward with its ballast wagons and borrowing the digger from the warehouse again to drop the ballast back around the point. Jobs a good un (childish? Not me.).
View attachment 89264
Here’s a shot from a distance away. I’m not sure which part of BR was responsible for weathering trackwork back then (probably the toilets on a mk1 actually), but I’ll need to get them in, and soon!
View attachment 89255
Thanks guys.
Although I haven’t been able to move off the sofa for a few evenings this week, I have been making steady progress with the fold up extensions on each end bit by bit.
The main aim is to tie it in to what I’ve already made so that it all looks like the one scene and this’ll mean reading back through the thread at some point (and my eBay purchases) to make sure that I go through the same processes.
So after much testing of the track (including @Peter C encouraging me to give the super-elevation a go), I was happy enough to blow a few coats of Railmatch Sleeper Grime over the track and make a start on the scenery.
Anyway here’s some photos of the first cuts of polystyrene (actually it’s off-cuts of Celotex type insulation board), roughly sawn to shape and then graded using two cheese graters. First a normal one and then a finer one like what you’d use for Parmesan if you’re posh like what I is.
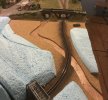
You can also see that I’ve cut into the top layer of cork to create the rivers that runs along the line in this area (the Yeo and the Taw).
Next up are a couple of photos (one taken with the flash as it highlights the contours) of the initial coat of filler and then after a soaking with PVA - the roads going in...
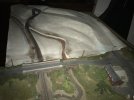
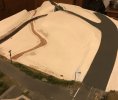
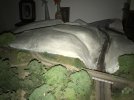
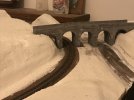
In the background (just behind the wee bridge and the opposite large bridge) will be a backscene (probably just sky to be honest) and my intention is that I’ll blend the various roads and railway into it via the copious use of trees...
Still thinking about this at the moment but I’ve got some ideas, and I’ve made a LOT of trees for this!
Around the back I’m creating a little mini cameo of Eggesford station, which is the next station north of Lapford on the Barnstaple branch and has a passing loop, which you won’t actually be able to see from the front (again because of the backscene), but it’ll be next to the fiddle yard and viewable when you’re operating the layout from behind.
It’s slightly different to the original due to the curves going the wrong way though, which is why I’m calling it Eggishford...
But I’m having fun making it.
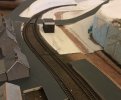
Here it is in all of its staggered platform weirdness:
So fellow railway modelling types, any thoughts would be much appreciated.
Bouncing ideas off each other is what it’s all about even if you end up going your own way with things...
Nick
Although I haven’t been able to move off the sofa for a few evenings this week, I have been making steady progress with the fold up extensions on each end bit by bit.
The main aim is to tie it in to what I’ve already made so that it all looks like the one scene and this’ll mean reading back through the thread at some point (and my eBay purchases) to make sure that I go through the same processes.
So after much testing of the track (including @Peter C encouraging me to give the super-elevation a go), I was happy enough to blow a few coats of Railmatch Sleeper Grime over the track and make a start on the scenery.
Anyway here’s some photos of the first cuts of polystyrene (actually it’s off-cuts of Celotex type insulation board), roughly sawn to shape and then graded using two cheese graters. First a normal one and then a finer one like what you’d use for Parmesan if you’re posh like what I is.

You can also see that I’ve cut into the top layer of cork to create the rivers that runs along the line in this area (the Yeo and the Taw).
Next up are a couple of photos (one taken with the flash as it highlights the contours) of the initial coat of filler and then after a soaking with PVA - the roads going in...


In the background (just behind the wee bridge and the opposite large bridge) will be a backscene (probably just sky to be honest) and my intention is that I’ll blend the various roads and railway into it via the copious use of trees...
Still thinking about this at the moment but I’ve got some ideas, and I’ve made a LOT of trees for this!
Around the back I’m creating a little mini cameo of Eggesford station, which is the next station north of Lapford on the Barnstaple branch and has a passing loop, which you won’t actually be able to see from the front (again because of the backscene), but it’ll be next to the fiddle yard and viewable when you’re operating the layout from behind.
It’s slightly different to the original due to the curves going the wrong way though, which is why I’m calling it Eggishford...
But I’m having fun making it.
Here it is in all of its staggered platform weirdness:

So fellow railway modelling types, any thoughts would be much appreciated.
Bouncing ideas off each other is what it’s all about even if you end up going your own way with things...
Nick
- Status
- Not open for further replies.

