• Our new ticketing site is now live! Using either this or the original site (both powered by TrainSplit) helps support the running of the forum with every ticket purchase! Find out more and ask any questions/give us feedback in this thread!

UK Based Trains In Lego

Class15

Established Member
Joined
30 Dec 2021
Messages
3,048
Location
North London or Mildmay line
Hi everyone, this is my first post on this forum.

I've always been a fan of the UK Railways as well as a big fan of Lego so i've decided to combine the two together and make some Lego creations based on various real life UK trains.

Lego nowadays has become super-realistic with many of their sets and themes (in particular with their Technic & Speed Champions Car themes and many of their Movies & Superheroes themes).

While Lego have released many train sets over the past several years, i've always felt they were quite generic and lacking proper detail (with the exception of the 60051 set which reminds me of the German ICE trains and another small set released years ago that was based on an american BNSF locomotive).

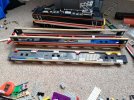
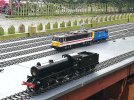
Over the last few months, i've designed several Lego MOC's (MOC stands for My Own Creation) based on various UK based trains using a Lego Design program called Bricklink Studio 2.0. Here are pictures of several of my designs:

View attachment 134399
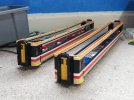
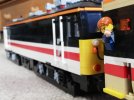
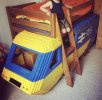
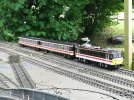
Network Southeast Class 421 4-Car EMU Train.
Why did I think that was a 317! :oops:
 
Sponsor Post - registered members do not see these adverts; click here to register, or click here to log in
R

RailUK Forums

61653 HTAFC

Veteran Member
Joined
18 Dec 2012
Messages
18,545
Location
Yorkshire
One of the driving carriages with a door open using a clever hinge system. I did try to perfect the big X near the front of the train which is represented here by the yellow and purple pieces (i'll let you be the judge of how good or bad it looks).
That looks really good. What the 'X' motif proves there, is that (much like with model railways and use of things like forced perspective) being a exact match isn't always required, and can even (paradoxically) be less convincing than a less "perfect" representation.

Something I've recently been reminded of thanks to my brother finding some old photos, was an attempt to make a vaguely 158-esque unit out of Lego as a kid (unfortunately I didn't take a copy on my phone). This was far less refined than the other examples on this thread, as it used many existing parts from the lego trains we had and techniques such as "SNOT" mentioned by the OP wasn't something we were aware of- there was of course no Internet back then (at least not for your average ten-year-old). I attempted to be a bit adventurous with the livery, with a transition from red-over-blue to yellow-over-red, though this was rather crude with a clumsy "stepped" transition. The front ends also were a bit slapdash, being 6 studs wide (standard lego train width) and thus only having a window in the centre gangway.

I'll try and get a photo of the photo if I remember, just for an illustration of how far things have come in the 30 years since!
 

315801

Member
Joined
12 Jul 2022
Messages
201
Screenshot_20230826_195629_Chrome.jpgScreenshot_20230826_195438_Chrome.jpg

Just found these while researching the Merseyrail Class 777 units
 

sciisfun

Member
Joined
28 Aug 2015
Messages
208
Location
south west
not my listing on ebay, but I do own one of these, im trying to make and match coaches as well as colour swap for other opperators.
 
Joined
31 Aug 2020
Messages
77
Location
Morecambe
Here is a Swallow 86 I've built for Guage 1. 54cm buffer to buffer iirc. I used the blueprints and divided by 32, then just went to the nearest stud.
 

Attachments

  • IMG_20231007_135529.jpg
    IMG_20231007_135529.jpg
    3.3 MB · Views: 154
  • IMG_20231007_134822.jpg
    IMG_20231007_134822.jpg
    4.2 MB · Views: 154
  • IMG_20231007_150703.jpg
    IMG_20231007_150703.jpg
    4.2 MB · Views: 156

Cowley

Forum Staff
Staff Member
Global Moderator
Joined
15 Apr 2016
Messages
17,221
Location
Devon
Here is a Swallow 86 I've built for Guage 1. 54cm buffer to buffer iirc. I used the blueprints and divided by 32, then just went to the nearest stud.

That’s just brilliant. Did I read that you’re running these on Gauge 1 track? If so what do you use as wheelsets/motors etc?
 
Joined
31 Aug 2020
Messages
77
Location
Morecambe
I used the 6x AA battery box, A big knock off China motor and the regular power functions receiver and controller. Here's a pic of the bogie
 

Attachments

  • IMG_20231016_135925.jpg
    IMG_20231016_135925.jpg
    2.9 MB · Views: 51
Joined
4 May 2023
Messages
28
Location
Portsmouth
Here is my latest train MOC and my biggest one yet at over 4000 pieces total, a Class 205 Thumper DEMU in Connex livery.

8 Stud Class 205 Pic1.png
The train is massive, at 70 studs in length and 8 studs in width for each carriage. I decided to make this train MOC very highly detailed, this includes 3x2 seating with luggage racks, openable slam doors, detailed cab ends, detailed cab interiors, detailed bogies & underframes and a replica of the 4SRKT engine. Here are some more pics:

8 Stud Class 205 Pic2.5.png
8 Stud Class 205 Pic3.png
8 Stud Class 205 Pic7.png
8 Stud Class 205 Pic12.png
8 Stud Class 205 Pic17.png
8 Stud Class 205 Pic19.png
 

Cowley

Forum Staff
Staff Member
Global Moderator
Joined
15 Apr 2016
Messages
17,221
Location
Devon
Here is my latest train MOC and my biggest one yet at over 4000 pieces total, a Class 205 Thumper DEMU in Connex livery.

View attachment 148266
The train is massive, at 70 studs in length and 8 studs in width for each carriage. I decided to make this train MOC very highly detailed, this includes 3x2 seating with luggage racks, openable slam doors, detailed cab ends, detailed cab interiors, detailed bogies & underframes and a replica of the 4SRKT engine. Here are some more pics:

View attachment 148267
View attachment 148268
View attachment 148269
View attachment 148270
View attachment 148271
View attachment 148272

I think you’ve excelled yourself with this one. That’s just brilliant! :lol:
 

AlterEgo

Verified Rep - Wingin' It! Paul Lucas
Joined
30 Dec 2008
Messages
24,192
Location
LBK
I must say I am very impressed. Never thought this was possible in this small a scale with Lego!
 
Joined
4 May 2023
Messages
28
Location
Portsmouth
I think you’ve excelled yourself with this one. That’s just brilliant! :lol:
Thank you very much. I think this is definitely my best one yet with all the extra detail. The inspiration for this one came from the Orient Express recently released by Lego.
I must say I am very impressed. Never thought this was possible in this small a scale with Lego!
Thank you very much. It's largely thanks to Bricklink Studio 2.0 that this is now possible.
Blimey, what a beauty. I think I'd lose my patience after the first 400 pieces though! ;)
Thank you very much. There are a whopping 733 steps in the instructions for both carriages, it'd probably take double figures in hours to build.

Here is a Swallow 86 I've built for Guage 1. 54cm buffer to buffer iirc. I used the blueprints and divided by 32, then just went to the nearest stud.
That is a very nice build. I particularly like all of the detail on the front ends and pantograph.
 
Joined
31 Aug 2020
Messages
77
Location
Morecambe
Thank you very much. I think this is definitely my best one yet with all the extra detail. The inspiration for this one came from the Orient Express recently released by Lego.

Thank you very much. It's largely thanks to Bricklink Studio 2.0 that this is now possible.

Thank you very much. There are a whopping 733 steps in the instructions for both carriages, it'd probably take double figures in hours to build.


That is a very nice build. I particularly like all of the detail on the front ends and pantograph.
Here's some of the pantograph and roof detail. I'm thinking of making some Mk2s and a couple of motorail wagons to go with it. Basically an excuse to build some 80s / 90s cars in lego. However I'd need to do a motor and battery box upgrade (BuWizz) because currently it struggles to pull anything. However, I would have to move the RC receiver to accommodate a motor in the other bogie. That adds the problem that the receiver would look a bit out of place anywhere else on the roof.
 

Attachments

  • IMG_20231213_124717.jpg
    IMG_20231213_124717.jpg
    3.6 MB · Views: 87
  • IMG_20231213_124653.jpg
    IMG_20231213_124653.jpg
    3.3 MB · Views: 86

Ladder23

Established Member
Joined
29 Oct 2015
Messages
1,871
Thoroughly ennoyed reading this - they’re fantastic. I would love to replicate some of those,

I actually have made very good examples of Dennis refuse trucks, I’ve not done trains yet.

to add I’ll definitely be buying some of your guides/instructions!
 
Joined
4 May 2023
Messages
28
Location
Portsmouth
Here's some of the pantograph and roof detail. I'm thinking of making some Mk2s and a couple of motorail wagons to go with it. Basically an excuse to build some 80s / 90s cars in lego. However I'd need to do a motor and battery box upgrade (BuWizz) because currently it struggles to pull anything. However, I would have to move the RC receiver to accommodate a motor in the other bogie. That adds the problem that the receiver would look a bit out of place anywhere else on the roof.
Very nice roof detail. The motor I use for my designs is the Lego Powered Up Bluetooth system that the Lego City train sets use nowadays. It can move my Class 444 no problem (which is just over 2000 pieces total) but anything more than that and the motor starts to struggle (I coupled it to three coaches of my Class 421 to test and it was really struggling to move).
Thoroughly ennoyed reading this - they’re fantastic. I would love to replicate some of those,

I actually have made very good examples of Dennis refuse trucks, I’ve not done trains yet.

to add I’ll definitely be buying some of your guides/instructions!
Thank you very much. When designing the trains, I use what is called the SNOT systen (SNOT stands for Studs Not On Top). It basically means building sideways using bracket pieces and pieces with studs on the side. I typically use this system when trying to make the liveries look more realistic (and the front ends on some train designs).
 

CarrotPie

Member
Joined
18 Mar 2021
Messages
870
Location
̶F̶i̶n̶l̶a̶n̶d̶ Northern Sweden
However, I would have to move the RC receiver to accommodate a motor in the other bogie. That adds the problem that the receiver would look a bit out of place anywhere else on the roof.
Depending on how you orient the other reciever, you could put the other one next to it to make a sort of "double reciever" blob on the roof. Shouldn't look any more out of place than it does now.
 
Joined
4 May 2023
Messages
28
Location
Portsmouth
I have decided to make driving carriage-only versions of a few of my existing train MOC's to make it much more affordable to people that want to purchase and build the trains themselves (and probably save a lot of shelf space). Here are a few examples that I have uploaded to my Rebrickable page:

SWR 444 Pic5.png
SWR Class 444.

442pic5.png
SWT Class 442.

Class 700 Pic15 (driving carriage only).png
Thameslink Class 700. The lego minifigure seats inside are probably more comfy than the real thing.

450pic5.png
SWT Class 450.

All of these trains (execpt the 700) have doors that can be opened and closed using the handles. None of these trains are powered but are compatible with standard lego train track and can easily be moved by hand around the track.
 
Joined
31 Aug 2020
Messages
77
Location
Morecambe
Guage 1 mk3s currently under construction
 

Attachments

  • IMG_20240316_124714.jpg
    IMG_20240316_124714.jpg
    5.6 MB · Views: 115
  • IMG_20240321_125909.jpg
    IMG_20240321_125909.jpg
    3.4 MB · Views: 115
  • IMG_20240321_132414.jpg
    IMG_20240321_132414.jpg
    2.4 MB · Views: 119

JKF

Member
Joined
29 May 2019
Messages
977
Not sure what gauge these would class as, but I like to build my locomotives a little bit bigger… :E

IMG_3814.jpeg IMG_3815.jpeg
 

Attachments

  • IMG_3814.jpeg
    IMG_3814.jpeg
    1.5 MB · Views: 105
  • IMG_3815.jpeg
    IMG_3815.jpeg
    955.8 KB · Views: 103
Joined
4 May 2023
Messages
28
Location
Portsmouth
A quick update on what I have been up to lego trains-wise.

I decided to have a go at making some alternate builds of UK based trains. For those who don't know, an alternate build, also known as B Model, is a lego model that uses just the pieces from one lego set to create a completely different model.

Here are a few of my alternate builds using just parts from the Lego City 60197 Passenger Train set:

60197 NIR 450 Pic1.png60197 NIR 450 Pic3.png60197 NIR 450 Pic4.png
This is based on a Northern Ireland Railways (NIR) 450 Class Thumper DEMU Train.

60197 Tram Pic1.png60197 Tram Pic6.png60197 Tram Pic7.png
This is loosely based on a Class 153 without a front end gangway. Note the different light clusters on each end as well as a smaller cab at one end. I designed a station with parts left over after designing the train.

60197 Class 158 Pic1.png60197 Class 158 Pic4.png60197 Class 158 Pic5.png
This is based on a Class 158. The front ends are definitely my favourite part. This was achieved using bracket pieces as well as some sideways building. I also decided to use window panel pieces rotated 90 degrees to represent the doors (two panels for each door). The way the panel pieces are shaped capture the doors really well here. I also designed a station with parts left over after designing the train.

My favourite of the three is the Class 158 with the Thumper a close second.
 

Strathclyder

Established Member
Joined
12 Jun 2013
Messages
3,450
Location
Clydebank
A quick update on what I have been up to lego trains-wise.

I decided to have a go at making some alternate builds of UK based trains. For those who don't know, an alternate build, also known as B Model, is a lego model that uses just the pieces from one lego set to create a completely different model.

Here are a few of my alternate builds using just parts from the Lego City 60197 Passenger Train set:

View attachment 162423View attachment 162424View attachment 162425
This is based on a Northern Ireland Railways (NIR) 450 Class Thumper DEMU Train.

View attachment 162426View attachment 162428View attachment 162429
This is loosely based on a Class 153 without a front end gangway. Note the different light clusters on each end as well as a smaller cab at one end. I designed a station with parts left over after designing the train.

View attachment 162430View attachment 162431View attachment 162432
This is based on a Class 158. The front ends are definitely my favourite part. This was achieved using bracket pieces as well as some sideways building. I also decided to use window panel pieces rotated 90 degrees to represent the doors (two panels for each door). The way the panel pieces are shaped capture the doors really well here. I also designed a station with parts left over after designing the train.

My favourite of the three is the Class 158 with the Thumper a close second.
My avatar in Lego form at the top! Truly excellent work.
 
Joined
4 May 2023
Messages
28
Location
Portsmouth
My avatar in Lego form at the top! Truly excellent work.
Thank you very much.

60337 Class 158 Pic2.JPG 60337 Class 158 Pic3.JPG 60337 Class 158 Pic5.JPG 60337 Class 158 Pic6.JPG

60337 Class 158 Pic7.JPG 60337 Class 158 Pic8.JPG 60337 Class 158 Pic10.JPG
Class 158 made using only parts from the Lego City 60337 Passenger Train set. Also included is a signalbox with two aspect colour light signal. Definitely my favourite alt build so far.
 
Last edited:
Joined
31 Aug 2020
Messages
77
Location
Morecambe
Got the 86 running with the newly built mk3s today on my local model engineering society's guage 1 layout. I have upgraded the motors inside so there's now two body mounted lego XL motors and an 11.1v lipo battery in the first coach. I have also tucked away one of the 6x AAA battery packs in the rear cab for light engine moves if they are required. Unfortunately this set up still doesn't really cut the mustard, it goes quite slowly and I'm not sure how confident I would be of it pulling 5 more coaches and a DVT, let alone at a scale speed of 110 mph. Not to mention the motors have to run off of their own RC Reciever due to the fact if only one is used the thermistor trips and the model no longer moves until it has cooled down. This in turn has caused some problems where if only one of the Recievers recieve the RC signal from the controller, one motor stops whilst the other continues moving. I'll ponder some improvements and test out different gear ratios.
 

Attachments

  • IMG_20240804_122516.jpg
    IMG_20240804_122516.jpg
    4.3 MB · Views: 89
  • IMG_20240804_125324.jpg
    IMG_20240804_125324.jpg
    4.6 MB · Views: 87

Cowley

Forum Staff
Staff Member
Global Moderator
Joined
15 Apr 2016
Messages
17,221
Location
Devon
Got the 86 running with the newly built mk3s today on my local model engineering society's guage 1 layout. I have upgraded the motors inside so there's now two body mounted lego XL motors and an 11.1v lipo battery in the first coach. I have also tucked away one of the 6x AAA battery packs in the rear cab for light engine moves if they are required. Unfortunately this set up still doesn't really cut the mustard, it goes quite slowly and I'm not sure how confident I would be of it pulling 5 more coaches and a DVT, let alone at a scale speed of 110 mph. Not to mention the motors have to run off of their own RC Reciever due to the fact if only one is used the thermistor trips and the model no longer moves until it has cooled down. This in turn has caused some problems where if only one of the Recievers recieve the RC signal from the controller, one motor stops whilst the other continues moving. I'll ponder some improvements and test out different gear ratios.

Well it looks absolutely brilliant!
 

Top